Reviews of WWF King of the Ring, Chikyuu Kaihou Gun ZAS & how to install an LED back-light on a Game Boy Pocket.
Welcome to episode 15 of Game Boy Crammer. Today I’ll be reviewing WWF King of the Ring, Chikyuu Kaihou Gun ZAS. And I’ve got some tips on installing an LED backlight on a Game Boy Pocket. Thanks very much Retro League Podcast for mentioning my show.
That got me a few extra listeners. It just happens to be my favorite. Retro Game Podcast. If you don’t listen to it, you should definitely tune in. It’s the only retro game podcast that I know that doesn’t really wander away with different topics and sort of personal stories and stuff like that. They just get right down to business and talk about games.
They talk about games that they’ve played recently. They talk about recent virtual console releases and stuff like that. And they talk about old games. Pretty soon they’ll be winding up a series dealing with the death of each platform. So like, for example, the last Super Nintendo games. You know, everybody knows the launch titles, but how many people know what were the last games released for each system?
And they kind of go into detail about the lifespan of each system. And thank you very much to whoever was listening and told them about my podcasts. That’s really nice. First up, WWF King of the Ring. WWF King of the Ring by LJN was released in late 93 in the US and early 94 in Europe and Japan. It’s not like me to want to review sports games.
I know very little about wrestling. I thought I pretty much have to review this one because it’s the only Game Boy game I ever worked on. Back in 93, I’d been a couple of years out of college. I wasn’t able to find any work in the animation field that had been trained in classical animation. At the time, there was a recession and, you know, things were starting to go to computers.
I had intended to take computer animation, but by the time I’d finished the course, I was really tired of school. I just wanted to go out on my own. So after a couple years of working in department store, I had been making shareware games at home on my Amiga and I heard they were hiring this company called Grey Matter in Oakville.
So I put my stuff together on a VHS tape and popped on over and they hired me. My first project was WWF King of the Ring. Grey Matter was already into Super Nintendo games. When I got there, they were just finishing a very famous game you might have heard of called Wayne’s World. And they had finished something else called Bob.
Grey Matter started with Boulder Dash and Infiltrator and a bunch of other games, Fiendish Freddy. At the time, they were really working on Super Nintendo games. So this was going to be their last NES and Game Boy title. They had previously just released, I think the previous game was James Bond Jr. And I think before that, Captain Planet and the Planeteers.
But when I got there, this game was already underway. There was another artist working there, Gord McBride, and he drew the characters. So he was in the middle of animating these characters. I think they were drawn on paper and then scanned in and traced. I’m not sure. But, you know, basically, these are all blank characters.
So you had big wrestler guys and even bigger wrestler guys. So there’s two classes of wrestlers. And my job was to take these two sort of blank body animations and make them into these characters. So I’d have to take, you know, I take like the regular size guy and make him look like Hulk Hogan, change the pants color, and, you know, just basically coloring and drawing faces and hair and stuff like that.
It was initially made for the NES and then ported over the Game Boy at the same time. The programmer wasn’t actually in-house. It was this guy, Nick Eastridge. He was, I think he was with Mindscape originally. He was a sound programmer for Mindscape and he went and he was doing it. I think he did Gauntlet for NES.
The nicest guy. I only talked to him on the phone. I’ve never met the guy. Back then, game development was pretty quick. So we had a couple of months to put this game together. And I think it turned out OK for a wrestling game. I’m not sure because I never played any other wrestling games. So this will be a review about a wrestling game from a guy that doesn’t really know anything about wrestling games.
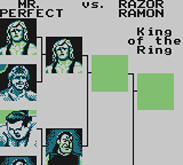
It was the final WWF game released for the NES. And the third one released for the Game Boy. The NES version had 11 wrestlers. You had Hulk Hogan, Randy Savage, Bret Hart, The Undertaker, Lex Luger, Mr. Perfect, Razor Ramon, Shawn Michaels, Yokozuna, and Bam Bam Bigelow. And you. This was a generic wrestler and you could change the name and you could change the attributes.
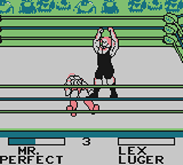
Sort of a build your own wrestler mode. But in the Game Boy version, there’s no Undertaker and Bam Bam Bigelow. So in this wonderful wrestling game, you can choose singles. There’s a championship, tag team and King of the Ring tournament mode. It’s not like some of the later wrestling games, I guess, because everybody’s got the same basic set of moves.
You got punch, you got kick, body slam, suplex, a throw, a drop kick. You can stomp and you can do elbow drops and you can jump off the corner thing. I think it’s called a turnbuckle. There’s no signature move. There’s, you know, Hulk Hogan doesn’t do his that thing where he puts his hand on his ear and then people cheer and then he leans the other way.
Nobody does anything like that. You basically have different speed, strength and stamina. However, you do get some nice music at the beginning for each wrestler. I guess back then, when a wrestler would show up, they’d have their own special kind of music. I imagine they probably do now, but I think I watch wrestling.
I used to watch Maple Leaf Wrestling when I was really young. Superfly and stuff like that. I didn’t really get into the WWF because I think I figured out that, I don’t know, it’s kind of a secret, but. Wrestling is sports. No wrestling for me. I don’t really get the speed thing and how it affects the gameplay, but strength and stamina are really obvious.
That’ll determine how quickly you get up from a fall. If there’s a grapple and you have more strength, you’ll have a better chance of winning. You do these body slams and like a suplex and stuff like that. They don’t really do anything like it. It doesn’t cause damage. You basically have to be stomping or doing the elbow drop to do much damage.
I think you can damage by kicking. Maybe not. I don’t think so. So one thing I find about this game, compared to a fighting game where, you know, it’s going to last just a few seconds. I was playing this yesterday, recording the sound. I had just one little battle that lasted about 10 minutes of just almost a stalemate.
Like, we’re both kind of even on the health bars, but no one’s really hurting each other. You can leave the ring, but there doesn’t seem to be a point. There’s no chairs or anything to throw out there. And you can’t throw people out of the ring. It’s sort of, well, I guess if you’re playing multiplayer, you can, you know, kind of tease your opponent or something. I’m not sure.
It doesn’t seem to have any effect in single player. You can actually hook this thing up with a game link and really fight with someone. I think from the NES version, I heard that it’s really more of a multiplayer game. Like, the AI is nothing really special. So yeah, you have all these different game modes, but the King of the Ring mode is really the one you want.
Here are all the moves. When you’re standing, you, you know, use your direction pad to move around. B is kick, A is punch. And you hold the D pad left and right and hit A to run. And then you just have to move close to the other guy and it’s going to grapple automatically. When you start running, you’re going to bounce off the ropes and bounce back.
And hopefully hit the other guy. So you want to do B to drop kick. A is just going to stop you dead in your tracks. If another guy’s running at you, you can elbow the guy with A. Now, when you get into a grapple with your opponent, generally I just whack the buttons and wiggle around, but there is some science to it.
You can hit B or hold a direction and hit B and it’s going to do a body slam. Hit A or down and A and it’ll do a headbutt. Go left or right and hit A. It’ll do a hip toss and then up and A is a vertical suplex. I had to look this stuff up because I have no idea what some of this stuff is. A headbutt?
You put your head on the guy’s butt? What does that even mean? Okay, once the opponent’s down, this is where you can actually get somewhere in the game because otherwise you’re not doing any damage. So once the guy’s down on the ground, B is stomp. This is what you’re going to do most of the time at the beginning because when the opponent’s stamina is really high, he’s going to get up right away.
So by the time you get to do an elbow drop, it’s too late. You’re doing an elbow drop on nothing. So then B is just stomp, stomp, stomp. A does an elbow drop. If you hold the D pad left or right and hit A, that’ll pin and you hold it. You don’t keep tapping. You just hold it down. There’s no point even doing this, it seems, until your opponent’s worn out.
Now, when your stamina is down to nothing, there’s nothing you can do to get up. If you still have some stamina left, you want to just wiggle around and whack those buttons until you get up. One thing I should mention about those running drop kicks is it’s kind of a timing thing when you hit the A button.
You can’t just hold A and it’s going to stop his running drop kick into you. You have to time it. Now, I remember when I worked on this, I really didn’t know much about any of these wrestlers. Like, I had no idea who Mr. Perfect was. I think I’d heard of The Undertaker. He was kind of new, I think. BamBam Bigelow had never heard of.
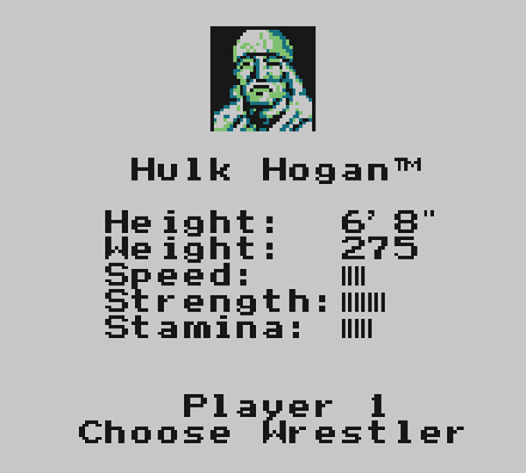
Yokozuna. Was he even in the WWF that long? So we had these slides that they sent us. So actual, you know, slides you put in the slide projector, except we just hold them up to the light. And that’s how I could see the pictures of these wrestlers to draw the portraits. Now, drawing the faces on the wrestlers, really, you only have about four pixels to work with.
It’s hard to even make it look human, let alone make it look like a specific wrestler. But I tried my best. Funny thing about Hulk Hogan? Not the sex tape. Well, I initially gave him a realistic hairline that’s like, that was Hulk Hogan’s hairline. And then I got a message back from the WWF that, well, they had a meeting and Hulk doesn’t like his hairline.
So I added a couple of pixels. I put it right up to, not quite on his forehead, but pretty far. And I got another message back, not far enough. So I gave him a real rug. Like, I exaggerated and put it in, like, a lot of hair. Very low hairline. And he enjoyed it. But you don’t really see it on the Game Boy version, you see it more on the NES version.
And there was one wrestler who didn’t like being in the larger body category, but I can’t remember who it was. There’s somebody that was, I guess, borderline, supposed to be in the bigger weight category. I just took a guess. I looked at them and I’m like, well, that guy is bigger than Hulk Hogan, so he must be in the other category.
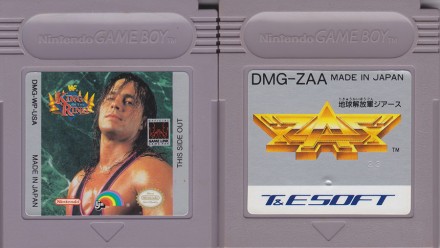
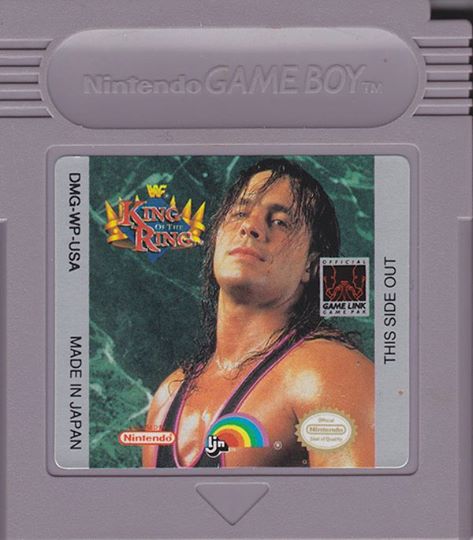
It was really a short project and I went on to the Incredible Crash Dummies for the Super Nintendo. As far as I can tell from people’s reviews, it’s not the best WWF game on the Game Boy. It’s probably number three. So if you see it cheap, pick it up. There’s no reason not to get the Japanese version, because there’s not a lot of reading in this game.
To find it, search for DMG-WP for the US version, DMG-WP-NOEI for the European version, and DMG-WPA for the Japanese version. Let’s do an 8-review! Chikyu Kaihou Gun ZAS by T&Esoft was released in December of 1992 in Japan only. The name translates to Earth Liberation Army ZAS. It’s a top-down shooter.
There are two unique things about this shooter. Number one, there’s a ship that can go from a narrow ship to a wider ship with two indestructible side ships, which isn’t that unique. But what is unique is that you get that right from the start, you don’t need a power-up to get it, and you can just switch it on and off.
So you can go from wide to narrow at will, at least at the time no one had seen anything like that. Not that I can think of. The other thing is this game uses the timing on the original Game Boy screen to create two layers of background. It uses a flickering technique, which I guess it flashes on the screen every half cycle.
And what happens is, because of the persistence of the LCD on the old screen, you could see two pale layers over each other. So you get, sometimes you see a cloud layer, sometimes you see spaceship wreckage and stuff like that. So it creates this really interesting scrolling background. It doesn’t affect gameplay at all.
It’s just kind of a neat look. The same effect was used in the game Bubble Bobble to put more bubbles on the screen than the hardware would normally allow. One of the problems with this game and with that game is, it doesn’t emulate well. In some emulators, this will just flicker, and some other ones, you just won’t see the other layer.
I plugged this into the Super Game Boy. It didn’t really work out. It’s not so great on Game Boy Advance. Game Boy Color is acceptable. You see some flickering, but it’s not that bad. And it’s really good on the black and white Game Boy. However, I found that it was more playable on the Game Boy Color because, well, you know, with these fast shooters, you don’t want anything impeding your reflexes.
The kind of lag on the old display, sometimes you just can’t react quick enough. So I did enjoy it more on the Game Boy Color. There are five levels in this game, and they’re all very unique. It’s not one of these games where it’s just the same old thing over and over. It’s a short game. Maybe because of its high level of difficulty, it stretches out pretty long.
Not only do you get a boss at the end of every level, you also get a sub-boss. You can start on any level you like, and there’s three levels of difficulty. I found medium to be hard as nails. Like, unless you’re a real hardcore shooter fan, you’re probably going to have a lot of trouble with even medium.
If you’re really good at shooters, you might not have… You’ll still have some trouble. It gets pretty wild. You get one shield, and that’s it. And you don’t get a lot of… One-ups are very, very rare. I almost never see them. So you only get three lives and a few continues. So it’s… There’s not much to talk about as far as power-ups go, because, well, you have a shield and you have kind of a gun power-up, but it’s not really that impressive.
You know, there’s not a huge… You know, when you die and you come back, it’s not really a huge step backwards. It’s like, okay, my highest power shot is slightly better than the regular one. On the first stage, you get this kind of… I haven’t seen it in a shooter… I guess I’ve seen it before. I can’t remember where.
But you get this thing where it’s like axes, and then you get a chain with a spiky ball on it, and they’re rotating really slowly, but if you shoot the ball, it affects the rotation, so you can spin them the way you want to to get through. There’s so many things like this in this game where it’s some really interesting gameplay element, and like most games of that era, they would probably just milk that element.
It just shows up once. There’s a lot of little one-off things that, you know, you never get to see again in the whole game. You know, the first level, you get this cool multi-layered space background. You get like a starfield and planets, and then you get sort of spaceship wreckage and satellites and all kinds of stuff.
It’s really cool. On the second level, you’re inside a spaceship. Not so much of a multi-layer effect, but it’s very tight quarters. You know, the first level, you can kind of go anywhere. This one, it’s pretty tight. The mini-boss shoots Tetris blocks at you, and it’s not that hard, but the final boss, there’s a gun in the middle that shoots blocks at you, and while it’s shooting, that’s when it’s vulnerable.
Actually, when it’s sticking out, it’s vulnerable. So it shoots these blocks at you, and you can kind of lead where the blocks go by moving around, and then these big arms sweep around, and they sweep away some of the blocks, and they will also kill you. You can hide in the top part of the screen. There’s like a little, almost like a little parking spot made for you.
If you do that, you don’t really have enough time to go out and shoot the gun. I tried it, and I was like, I was going a long time, like 20 minutes on this boss. I’m like, why am I not damaging it? You have to go in the bottom left or right corner. Wait for the arms to move away, then shoot the gun. It took me a while to figure that one out.
Stage three, you’ve got this background with an alien world below and interesting little layer of blobby clouds. It’s just beautiful. You know, you don’t have time to look at the backgrounds when you’re playing this, so have someone look over your shoulder. There’s this part, there’s like rings of axes.
These rings spin around, and there’s a gap. You have to get into the gap to get in the middle of the ring, and then wait for the gap to happen on the other side and exit it. Now, in the easy mode, the gap’s pretty big. On medium and hard, you have to be very, very precise to get through that. It’s a lot of hit and miss.
This is after you’ve finished the mid-level boss, so I had to do this one a lot. Like, I had to play that first part of the level many times because it’s really easy to mess this up and lose all your lives. Stage four is a xenomorph, alien kind of stage, and there are unicorns that shoot guided missiles at you.
Stage five is another closed quarters inside a spaceship kind of level, except the walls move, and if you don’t memorize where they go, there are cases where you’re going to get trapped. But it’s a lot of stuff where you can use your wide version of your ship, because when you go in wide mode, you have these two indestructible side guns, and you can kind of go through walls with them.
They’re indestructible, so you can do anything with them. The final boss is two stages. You get a gelatinous cube that’s not too hard, and then these two monsters. They look like demons. The trick with this is, besides dodging a million bullets, oh man, it’s in hard mode. It’s nuts. I couldn’t finish it in hard mode.
I finished it in medium mode. There’s a lot of bullets on screen, and you can only get hit a couple of times if you have the shield. You have to wear down the enemies at the same rate. So you basically want to, you can’t tell what their health is, but you have to kind of gauge, oh, I shot this guy a lot.
He’s probably close to dying. I better shoot this other guy a little bit more, and then go back to the first one, shoot him a bit more, go back to the other one. You kind of try to balance it out. If you get them to die at the same time, or roughly the same time, one of them won’t revive the other. Otherwise, you can keep killing one, and the other one will revive it, and you never finish.
It’s an expensive game. If you’re going to play it on an emulator, and you’re not really seeing the real game, although if you play it on an emulator, and it’s not flickering at you, it’s still playable. You could play this on a flash cart, or be lucky like me. I got this for half a buck. I bought a whole bunch of games, and I’d heard of this game, but for some reason, I guess because the logo is kind of hard to figure out, I just threw this in a pile of games, and I was like at a flea market.
I was like, how much do you want for these? And I got it home, and I was like, oh, oh, this is ZAS. This is like worth 50 bucks or something. I don’t know what it’s worth, but they’re not commonly available. It’s kind of highly sought after, mostly because, I think, so many blogs gushing over how great it is.
If you want to do a search for ZAS, sometimes it’s hard to type in, because they just put the Chikyu Kaihou Gun isn’t always included on Japanese sites. If you look for DMG-ZAA, you might be able to find it. If you want a really clear view when you’re playing a Game Boy Color or Game Boy original game, you probably want to play it on a Game Boy Advance SP.
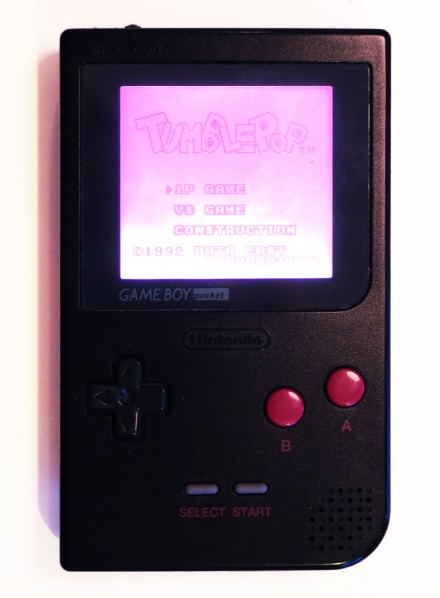
And in a previous article, I told you how you can add a front light from a Game Boy Advance SP into a Game Boy Color. But let’s say you want to play original Game Boy or Game Boy Pocket with a light. Now, of course, you can hook up a little Wyrm Light or some kind of front light with a magnifying glass.
I never had much luck with those. I always found it just made so much glare on the screen, it was better to just kind of sit under a lamp. Or you can also spring for a Game Boy Light, which is a Japan-only version. It’s a little bit like a Game Boy Pocket, but not quite the same dimensions, with an electro-luminescent backlight.
This is that kind of green, glowing stuff, like the old Timex Indiglo watches. Or you can install your own LED backlight. Now, much like the Game Boy Light, the contrast is not going to be very high. You have to kind of lower your expectations for contrast. This is going to be kind of pale, but at least you can play it in the dark.
And you’re still going to have the same problems with motion blurring and the general limitations of the old Game Boy LCDs. But one thing you can do that you can’t do with any other screen is there’s kind of a timing trick that a lot of these games use. Bubble Bobble is a good example. Or a shooter called ZAS, or Zast, where they’ll basically use the timing and do kind of like a what you’d call on video an interlace, where every second frame you’re basically turning off some pixels.
And you can actually make more shades of gray than you could normally display on a Game Boy screen. Well, this effect doesn’t really work in an emulator, at least none that I’ve seen. And it doesn’t really work on the Game Boy Color screen because it doesn’t use the same kind of timing trick. Sorry, I’m a little scant on the technical details, but it just don’t look right.
I ordered an LED backlight from a company called ASM Retro, but there are other people that make them. It’s available in white, yellow, red, blue, green, orange, and pink. I got the pink one because I got a black Game Boy with pink buttons on it. And what you’re going to get is a little square with two leads on it.
There’s a resistor built in. Now, with LEDs, it’s kind of weird voodoo magic. In order to draw current, you need to have some kind of resistance. So you have to have a resistor to be able to draw current through the LED. That’s how they work. So the resistor is actually built inside this thing, so you don’t actually need to add one.
You’re going to solder two wires to two points on the board where it can get power. That’s all there is to it. There’s also a polarizing filter. You’ll need that so the LCD can do its magic. This thing is initially designed for the DMG, the original Game Boy. They mention on the site that it’s easier to install this thing on the original Game Boy, and kind of tough to do it on the Game Boy Pocket.
So I’ll tell you a little bit about how my installation went and some of the things you can look out for to make it hopefully go smoother than it went for me. Now, what you get with this thing, which was only, this thing was only 12 bucks. It’s actually pretty good. And with shipping, it only came to 20.
That’s to ship it all the way from the U.S. to Japan. Before you actually install this thing, you need to remove the original foil on the back of the original display, and you have to remove a layer of plastic, which is the original polarizing filter. And this stuff is glued to the back of the glass.
While it’s not hard to open up your Game Boy, you will need that special tri-wing screwdriver. That part’s pretty easy, and there’s instructions on the site how to do it. The hard part is getting the old stuff off. The installation is very easy, but getting the back foil and the polarizing filter off the back of the glass is really hard, because unlike the original Game Boy, this thing is very, very, very sensitive.
I kind of sacrificed a Game Boy to make this. I still kept the rest of it, but I did ruin the screen completely. So when you look at this thing, there is a ribbon cable that’s on the side, and there’s a ribbon cable on the bottom. The ribbon cable on the side looks gray. It’s actually really fine black and white lines.
The one on the bottom is kind of brown circuit board colored, and it hooks up to a little green circuit board, and that thing is connected to glass with hundreds of little black and white lines. The problem is, and to me the most delicate spot is, where the ribbon cable connects to that little green circuit board.
It’s very, very sensitive, because you have two layers of very, very thin metal connecting together. It creates a really, really weak point where it’s very easy to tear that, and once you’ve torn it, there’s no fixing it. You can’t just sit there and solder it, because you’re basically soldering nothing to nothing.
So before you even start any of this stuff, you can read the directions on the site, which will explain how it’s like a protective plastic on the backlight. You can peel that off and stick it on the front so you don’t get scratches and fingerprints on the front of the screen. What you can do to protect this very, very weak point is to simply tape it up, and if I had done that, I wouldn’t have ruined this ribbon cable.
So you can just layer it with some clear, put some clear tape on it so you can see what you’re doing, and just put tape over any of the weak parts that might bend, because you’re going to be doing, while you’re getting this screen off, you’re going to be doing lots of scraping with a razor blade. You’re going to be doing lots of Q-tip alcohol cleaning.
It took me hours of cleaning to get that screen clean in the back. It’s hours of nudging this very, very delicate ribbon cable. So anything you can do to protect any of these weak points is really going to help you out. So once you have that thing taped up, then you can start working. So what I did is I took a razor blade, and there’s a layer of foil, and there’s a layer of polarized plastic.
It’s hard for it to come off, because it’s kind of stiff, and you can’t really reef it too hard, because that’s a thin chunk of glass. It’s probably really easy to crack it. You have to be very gentle and take your time with that razor blade, and just kind of… I actually took scissors and kind of cut a piece off when I was getting closer, because the way the ribbon cables are situated on the screen, there’s very little room to move around.
Like, there’s one corner where you can barely even fit the Q-tip under to clean the glass, and you can’t really see what you’re doing unless you look underneath. And there’s very few spots where you can hold it. There’s two really sharp corners that you can kind of hold on to, where you’re not actually touching a ribbon cable.
There’s not really a good place to get a grip on it while you’re hacking away at it with the razor blade. Prepare to use a lot of Q-tips. I probably went through a dozen Q-tips digging away at the goo at the back of that screen. Basically, the whole process took me about four hours, because I had to do maybe five.
I had to do everything twice. And the second time, I really, really took my time getting the back of that screen off. After you’ve done that, the rest of it’s very simple. You’re going to be placing the screen. It doesn’t… The constructions are very confusing. You don’t peel anything off the backlight.
The backlight has two white sides. One of them is the right side that’s supposed to face the screen. They don’t tell you which side it is. One of them is a little bit more silvery than the other. It’s hard to explain, but they don’t… Whichever is the shiniest side is not the side that’s going to be facing the screen.
I actually took two batteries. I taped them together and then just tested the light. Just see which side is the brighter side. And between that light and the glass, you want to put your polarized plastic. The way this thing is cut out, there’s kind of a cut shape that you’ll… If you’re like me, you’ll be wondering, how does this shape relate to my Game Boy?
It really doesn’t. The notch goes on the top, or I guess it could go on the bottom. There’s a right way and the wrong way to do it. You can’t put it 90 degrees. You can’t put it sideways. So the notch either goes up or down. If you put it sideways, you’re going to get an inverted screen that’s going to be very hard to see.
You will have to do some cutting. They don’t mention that on the site. You’ll see when you try to put it in, it doesn’t quite fit. There are two layers of plastic protecting this polarized screen that you’ll have to peel off. Do that at the last minute. I would do the cutting of the shape first and then fit it in there, make sure it fits right, and then put the whole thing together.
Be very careful that the wires are situated in a way that you’re not putting any pressure on the glass when you screw your case together, because it’s very easy for that wire. You know, if you’re putting it back together, then the wire kind of pops behind the screen. You end up putting pressure on the glass, and that’s a very thin piece of glass.
I’m sure it’s pretty easy to crack it. The first time I put it together, I started to put the screws in. I was like, whoa, that’s a little bit too hard to push. And I realized the screen was kind of something’s wrong there. I looked and it was like the wire’s kind of messed up. Speaking of wires, you will have to solder to two points on the board, which are shown on the site.
There’s actually, they give you some alternate points in case you already have some modifications soldered to those things. One of the points, the ground that you’re soldering to, which is the black wire, already has solder on it. The other one doesn’t actually have any solder yet, so you’ll have to heat it up, put a blob of solder on there, and then take your tin wire and just solder right to it.
It’s really singy. A lot easier than the stuff I had to do when I was doing the front light on the Game Boy Color. In a way, the Game Boy Color front light was a harder project because you have to modify the case. You have to cut away pieces of the case. There’s that very, very risky soldering job where you have to solder two wires onto a ribbon cable.
That being said, I did ruin a Game Boy screen, so I’ve got some spare parts now. The end result is it looks great. It does drain the batteries notably quicker than it drains the Game Boy Color batteries, I guess because your Game Boy Pocket only has two AAA batteries. But it looks great and I’m glad I did it.
You know, you don’t need a lot of soldering skills. You just need a lot of patience and a razor blade and some Q-tips and a tri-wing screwdriver. Maybe keep a spare Game Boy Pocket handy just in case things go wrong. There are some choices for backlights, but the one I use and the one I recommend is from ASM Retro, the Density Backlight.